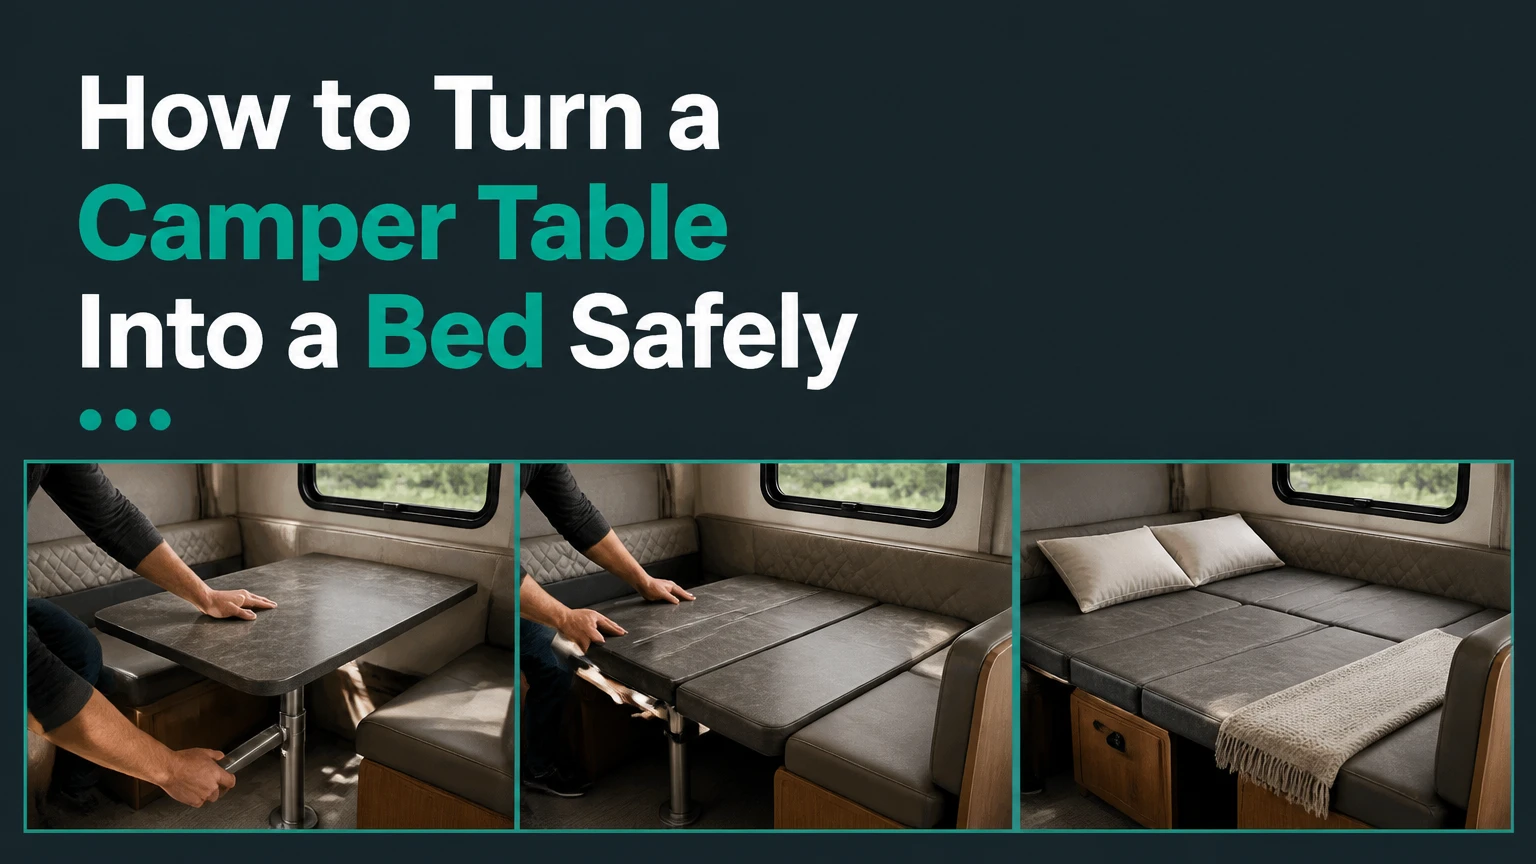
A camper table becomes a bed when its tabletop is lowered onto support cleats between opposing bench seats, creating a central deck that sits level with the seat cushions. Remove the back cushions, lower or remove the pedestal, place the tabletop on the cleats, and rearrange the cushions across the complete platform. The conversion usually takes 1-3 minutes.
Key Facts at a Glance
- A removable-pedestal dinette conversion commonly takes 60-120 seconds.
- The tabletop must rest on structural cleats or a rated lowering frame, not on loose cushions.
- Typical dinette tabletop height is 27-29 inches, while the lowered bed deck is commonly 12-14 inches above the floor.
- A 1/8-inch height error can create a noticeable ridge or depression under sleeping cushions.
- Table hardware ratings apply to the hardware and its installation, not automatically to the mattress or two occupants.
- Wall-mounted table rails require solid blocking behind thin camper wall panels.
Before You Start
A standard removable-pedestal conversion needs no new hardware if the dinette already has matching support lips inside both benches. Confirm the mechanism before lifting anything, because a tabletop on a telescoping column, wall rail, or hinged scissor base follows a different procedure.
| Requirement | Typical value | Why it matters |
|---|---|---|
| Conversion time | 1-3 minutes | Includes cushion removal and storage |
| DIY difficulty | Low for removable pedestal | Moderate to high for structural retrofits |
| New hardware cost | $0-$380 | Existing system may need no replacement |
| Measuring tape | 1 x 60-inch | Checks deck and cushion dimensions |
| Bubble level | 1 x 6-9-inch | Verifies tabletop and cleat alignment |
| Rubber mallet | 1 x small non-marring | Frees a stuck taper without damaging metal |
| Anti-slip mesh | 1 x platform-sized sheet | Reduces cushion movement |
| Two-person handling | Recommended above 36 inches | Prevents twisting and edge damage |
Can any camper table become a bed?
No. A camper table can become a safe bed only when the tabletop, support frame, and surrounding benches can carry the expected load without bending, sliding, or pulling out. A fixed dining table with no lower support structure needs a designed retrofit, such as a folding pedestal, wall rail with backer, or independent center frame.
Inspect four conditions first:
- The tabletop: Measure its length, width, thickness, and visible sag. Particleboard with water damage should not become a sleeping deck.
- The supports: Identify pedestal tubes, a telescoping column, folding legs, wall sliders, or fixed brackets.
- The benches: Look for cleats, ledges, or framing that can support both tabletop edges continuously.
- The cushions: Confirm that the seat and back cushions fill the converted footprint without forcing seams upward.
Do not rely on a tabletop that merely touches the bench fronts. The edge must bear on framing, a continuous cleat, or hardware rated for the intended load.
How the Conversion Works
A camper dinette bed uses a three-part load path: the tabletop spans the center, the bench cleats support its edges, and the cushions provide the sleeping surface. The tabletop should transfer force into the bench structure rather than into pedestal sockets, thin wall skins, or removable cushion foam.
Most factory dinettes use backrest cushions as infill pieces. Once removed from the wall, those cushions lie horizontally between or over the seat cushions. The finished platform should have no exposed tabletop edge beneath a sleeper’s shoulder or hip.
What supports the lowered tabletop?
The support is normally a pair of wooden or molded cleats fixed to the inside faces of the opposing benches. Cleat height determines the final deck height, so both cleats must share the same elevation and must attach to framing rather than unsupported paneling.
Measure from the same reference point on both benches, preferably the floor or the original seat platform. A practical installation tolerance is 1/8 inch across the tabletop width. Greater differences can produce a hard ridge, a cushion valley, or a tabletop that rocks under movement.
A pedestal supports the table in dining mode. It may not be the correct support in bed mode. Remove it when the tabletop is designed to transfer its load to the bench cleats.
Step-by-Step Conversion
Step 1: Clear and Inspect the Dinette
Remove dishes, electronics, drinks, and loose objects from the tabletop and adjacent benches. Open the storage compartments where the pedestal or table legs will go, and check that the planned storage space is free of water, tools, and sharp hardware.
Look underneath the table before applying force. Identify a tapered pedestal fitting, push-button collar, spring latch, hinged frame, or wall-mounted slide. Photograph the normal dining arrangement if the hardware is unfamiliar.
You will know it worked when: the tabletop is empty, the mechanism is identified, and the storage location is ready.
Common mistake: pulling upward on a hinged or latched table as though it were a friction-fit pedestal. That can bend a release lever or tear a wall rail.
Step 2: Remove the Backrest Cushions
Lift or pull each backrest cushion away from the wall. Some cushions use hook-and-loop strips, snap fasteners, or retaining buttons, so separate those attachments before applying a sideways force.
Place the cushions on a clean, dry surface. Keep left and right pieces in their original positions, because curved corners and different seam placements often prevent them from fitting interchangeably.
You will know it worked when: the bench seat cushions remain in place and the backrests are detached without torn fabric or pulled fasteners.
Common mistake: stacking damp cushions against an exterior wall. Condensation can remain trapped between foam and vinyl, creating odor and mildew during storage.
Step 3: Release and Remove the Tabletop
For a tapered pedestal, hold opposite tabletop edges and lift vertically while gently rocking the top a few degrees side to side. Avoid twisting one corner sharply, because uneven force can loosen the mounting plate or crack a laminated tabletop.
For a spring-button pedestal, press the release button or collar while lifting. For a locking telescoping column, use the manufacturer’s release lever and support the tabletop with both hands. If the top weighs more than one person can control comfortably, use two people.
You will know it worked when: the tabletop separates from the column or lowering mechanism without bending the mounting plate.
Common mistake: hammering the tabletop downward during reassembly. A tapered post should seat firmly by hand pressure; over-driving it can wedge the parts together.
Step 4: Store or Collapse the Support Hardware
Remove pedestal tubes from their floor sockets only when the design requires removal. Twist the tube gently counterclockwise if the socket uses a threaded or friction collar, then place the tube where it cannot roll into a walkway.
For a telescoping or scissor mechanism, operate the release according to its design and keep fingers away from pinch points. Secure loose tubes and brackets before the camper moves. A 2-inch metal tube can damage cabinetry or injure someone if it becomes a projectile during braking.
You will know it worked when: no removable hardware protrudes above the intended bed deck and the stored parts cannot shift during travel.
Common mistake: leaving a pedestal tube under the cushions. A tube beneath foam creates a pressure point and may damage the cushion cover.
Step 5: Lower the Tabletop Onto the Cleats
Place the tabletop flat across the opposing bench supports, with its long edges fully seated on the cleats or lower frame. Center the tabletop from side to side, then check the surface with a short bubble level in both directions.
The tabletop should sit flush with the seat cushion platforms. If one edge is high, stop and measure the cleats instead of adding random shims beneath the mattress. For a permanent correction, use solid, mechanically fastened blocking that matches the bench framing and does not reduce the support contact area.
You will know it worked when: the deck does not rock, both edges have continuous support, and the level shows no obvious slope across the sleeping width.
Common mistake: placing the tabletop on top of the seat cushions. Cushions compress unevenly and cannot provide a predictable structural bearing surface.
Step 6: Arrange the Cushions Into a Mattress
Place the seat cushions in their normal horizontal positions first. Then rotate the backrest cushions and fit them into the remaining center or perimeter spaces, following the original cushion layout.
Check every seam with your hand. A seam or hard edge under the shoulder can become painful overnight, while a gap wider than about 1 inch can trap an arm, phone, or bedding. Add a fitted sheet, thin mattress pad, or platform-sized anti-slip mesh after the cushions are aligned.
You will know it worked when: the mattress feels continuous, the cushions do not slide during a firm hand push, and no tabletop edge or hardware is exposed.
Common mistake: forcing an oversized back cushion into a narrow gap. Compression creates a raised ridge and can push adjacent cushions off the cleats.
Which Camper Table Hardware Is Installed?
The best conversion hardware depends on the existing support method, available floor space, installation backing, and how often the bed will be used. Removable pedestal tubes are usually the least expensive, while telescoping columns reduce lifting and wall rails preserve floor space.
| Hardware type | Bed conversion method | Typical dimensions | Typical cost and time |
|---|---|---|---|
| Removable pedestal tubes | Lift tabletop, remove 1-2 tubes, rest top on cleats | Dining height 27-29 inches; bed deck 12-14 inches; tube diameter 2-2.5 inches | $35-$75; 60-120 seconds |
| Telescoping pedestal | Release clamp or gas-assisted column and lower vertically | Extended height 27-28 inches; low height 12-13 inches; 88-176-pound hardware ratings | $180-$380; 10-30 seconds |
| Articulated scissor base | Release lever folds parallel links downward | Lowered profile 4-5 inches; travel about 14-28 inches | $80-$150; 15-45 seconds |
| Wall-mounted slider | Release wall rail and fold or retract outer leg | Rail length 36-40 inches; leg adjustment 21-36 inches | $40-$90; 45-90 seconds |
| Fixed-table retrofit | Add center frame, cleats, or replacement pedestal | Deck height set by bench framing; support span varies | $50-$300; 2-8 hours |
Which mechanism is best for a small campervan?
A wall-mounted slider or folding rail usually preserves the most floor space because it removes the central pedestal. The wall must contain solid wood blocking, an aluminum frame member, or a properly engineered backer plate behind the rail.
A removable pedestal is a better choice when the camper has thin walls, uncertain framing, or a freestanding dinette. It places less demand on the wall but requires a storage location for the tubes and more lifting during each conversion.
Which mechanism is best for frequent family use?
A telescoping gas-assisted pedestal reduces repeated lifting and can convert in roughly 10-30 seconds. Choose a model whose documented rating exceeds the combined expected occupant load and the dynamic forces created when someone sits down, rather than selecting by tabletop weight alone.
Gas assistance does not eliminate wobble. A narrow column can still flex if the floor plate is loose, the mounting substrate is weak, or the column is not fully locked at either height.
| Decision factor | Removable tubes | Telescoping pedestal | Scissor base | Wall slider |
|---|---|---|---|---|
| Typical new-hardware price | $35-$75 | $180-$380 | $80-$150 | $40-$90 |
| Conversion time | 60-120 seconds | 10-30 seconds | 15-45 seconds | 45-90 seconds |
| Loose parts after conversion | 1-2 tubes | 0 | 0-1 release handle | 0-1 folding leg |
| Floor obstruction in bed mode | None if removed | 4-8-inch column footprint | 4-5-inch folded profile | Usually none |
| Wall reinforcement required | No | No, if floor-mounted | No, if floor-mounted | Yes |
| Typical DIY difficulty | Low | Moderate | Moderate | Moderate to high |
How Much Time and Money Does the Conversion Take?
A factory-equipped camper table converts without material cost and usually takes 1-3 minutes. A retrofit costs approximately $50-$300 for cleats, brackets, a replacement pedestal, fasteners, and cushion alterations, with labor ranging from 2-8 hours depending on access to the bench framing.
| Project type | Materials | Labor time | Typical total cost |
|---|---|---|---|
| Existing removable pedestal | None or anti-slip mesh | 1-3 minutes per use | $0-$25 |
| New bench cleats | Hardwood or aluminum cleats, screws, adhesive | 2-4 hours | $50-$140 |
| Replacement telescoping column | Pedestal, mounting plates, fasteners | 1-3 hours | $180-$450 |
| Wall slider retrofit | Rail, folding leg, backer board, fasteners | 4-8 hours | $150-$400 |
| Cushion refit | High-density foam, upholstery fabric, template | 3-8 hours | $120-$500 |
Measure twice before buying hardware. A pedestal advertised for a 27-inch dining table may not lower far enough to meet a 12-inch bench support, and a wall rail sized for a 36-inch span may not fit the camper’s actual opening.
What Load and Safety Checks Matter?
The tabletop must carry the sleeping load through its supported edges, and the cleats must transfer that force into bench framing. Hardware labels such as 88 pounds or 176 pounds are product-specific ratings, not universal guarantees for two adults, because fastener type, substrate, leverage, and installation direction change the result.
Use these conservative checks:
- Support width: Keep at least 1 inch of tabletop edge on each cleat, with continuous contact along the supported span.
- Deflection: A tabletop that visibly bows under a moderate hand load needs reinforcement or replacement.
- Fasteners: Drive screws into structural wood or metal, not only 3/16-inch decorative plywood.
- Movement: Push the deck at its center and corners. Any rocking indicates uneven support or a loose bracket.
- Camper position: Park as level as practical before sleeping. A side slope can make cushions migrate and increase loads on one edge.
- Access: Keep the aisle, emergency exit, propane shutoff, and electrical access clear during installation and use.
A sleeping platform is not automatically a certified crash seat. Never occupy the converted bed while the camper is moving unless the vehicle manufacturer has specifically approved that position for travel.
How Do You Prevent Cushion Gaps and Sliding?
Cushion movement usually comes from incorrect dimensions, slick upholstery, a sloped deck, or missing infill foam. Anti-slip mesh beneath the assembled cushions is a reversible first step, while a fitted mattress pad can distribute small height differences across the platform.
Measure the converted opening at its narrowest point and compare it with the cushion layout. If a gap exceeds approximately 1 inch, use a properly sized foam insert rather than loose blankets, which compress unpredictably. For regular use, medium- to high-density upholstery foam generally holds its shape better than soft packing foam, though the correct density depends on thickness and occupant weight.
Moisture control matters in camper bedding. Remove or ventilate cushions each morning, especially when vinyl covers meet cold exterior walls. A thin breathable layer can reduce condensation, but it cannot correct a leaking window or wet wall cavity.
Common Mistakes and How to Fix Them
The tabletop will not lift off
A tapered pedestal may be friction-locked by side loading, corrosion, or dirt. Remove cushions, have one person stabilize the pedestal, and rock the tabletop gently in alternating directions while lifting evenly.
Do not hammer the tabletop or pry against laminated cabinetry. Clean the taper after removal and inspect for burrs. Silicone lubricant is not automatically appropriate, because some manufacturers require clean, dry mating surfaces and lubricant can increase slipping; follow the hardware instructions first.
The bed deck is uneven
Uneven cleats, a warped tabletop, or a camper parked on a slope can produce a ridge. Measure both cleats from the floor, check the tabletop on a flat surface, and correct the structural cause before using shims.
A thin removable shim can test the diagnosis. It should not replace a properly fastened support when the bed will carry two adults.
The table wobbles in dining mode
Check the floor plate screws, mounting substrate, collar, and pedestal taper. Stripped screws need a structural repair, not simply more tightening. A dual-stage locking pedestal can reduce movement, but it cannot compensate for a weak floor panel.
Cushions separate during sleep
Install anti-slip mesh, reverse the cushion arrangement, or add correctly sized infill foam. If the deck slopes, fix the slope first. A topper can improve comfort but may hide a structural gap that still needs correction.
The wall rail pulls loose
Stop using the bed immediately if screws loosen or the wall skin flexes. Remove the rail and install a backer board that spreads the load across several framing members. Thin decorative plywood alone is not an adequate anchor for a two-person sleeping platform.
Variations for Different Camper Layouts
Fixed tabletop with no original bed supports
Build two opposing cleats inside the benches or install a dedicated folding frame. Set the cleat height by measuring the existing seat cushion platform, then subtract the tabletop thickness so the finished deck aligns with the cushions.
Keep the new cleats broad enough to support the tabletop edge continuously. Test the platform with the camper stationary before adding bedding.
Wall-mounted table in a narrow campervan
A wall rail with a folding outer leg can preserve a clear aisle, but the rail needs structural backing. Use a backer plate that spans multiple studs or frame members, and seal any new exterior-facing penetrations according to the camper manufacturer’s construction.
Check the rail’s locked position before placing weight on the outer edge. Wall systems have greater leverage than central pedestals, so edge loading exposes weak fasteners quickly.
Uneven campsite or sloped floor
Level the camper before conversion whenever possible. If the slope is unavoidable, orient the bed so the head is slightly higher than the feet and secure cushions with mesh or a fitted sheet.
Do not compensate for a floor slope by installing permanently crooked cleats. The bed should be level relative to the camper’s intended parked orientation, and the tabletop should remain square to the bench structures.
Expert Rules That Prevent Expensive Repairs
- Set cleat height from the cushions, not from the tabletop. Measure the top of the seat cushion platform first, then position the tabletop so its upper surface matches that level. Table thickness alone does not determine comfort.
- Test load transfer at the edges. Sit near the center and then near each supported edge while another person watches the cleats and fasteners. Movement at an edge reveals a support problem earlier than movement at the center.
- Store hardware by conversion sequence. Keep tubes, release pins, and small collars in one labeled pouch near the dinette. Missing a locking pin is more dangerous than taking an extra minute to convert.
- Separate comfort fixes from structural fixes. A mattress topper can smooth a 1/8-inch cushion transition, but it cannot make a loose pedestal, unsupported wall rail, or cracked tabletop safe.
- Use the original cushion geometry as evidence. Factory cushions often reveal the intended bed orientation through seams, corner radii, and fasteners. Reversing them may create a gap even when the dimensions appear correct.
FAQ
Can I sleep directly on the camper tabletop?
No. A bare tabletop is hard, cold, and vulnerable to concentrated loading at its center or edges. Use the designed seat and back cushions, a properly supported foam mattress, or a mattress pad that covers the complete platform without allowing sleepers to contact exposed hardware.
How thick should a camper bed cushion be?
A practical replacement cushion is often 3-5 inches thick, but thickness alone does not determine comfort or support. Match the original cushion height so the sleeping surface remains level with the tabletop, and choose foam appropriate for the expected load and available storage space.
Can two adults use a dinette bed?
Two adults can use a dinette bed when the tabletop, cleats, bench framing, pedestal removal system, and cushions are all designed or verified for their combined load. A manufacturer’s hardware rating should be treated as a component limit, not proof that the complete camper structure supports two occupants.
Should I replace the cushions after conversion?
Replace cushions when foam has collapsed, seams create pressure points, moisture has damaged the interior, or the pieces do not fill the bed opening. If the existing foam remains firm and fits correctly, an anti-slip layer and washable mattress pad may provide a less expensive improvement.
How do I store the table while using the bed?
Store the tabletop only if the camper design requires it. A table resting on the bench cleats normally remains in place as the bed deck, while removable pedestal tubes belong in a secured cabinet or under-bench compartment where they cannot shift during travel.
Can I leave the camper bed assembled?
Yes, while parked, provided the cushions are dry, the platform is stable, and exits, appliances, and required access panels remain usable. Convert the area back to its travel-safe configuration before driving unless the camper manufacturer explicitly permits the bed arrangement during motion.
The Bottom Line
To turn a camper table into a bed, remove the backrest cushions, release and store the pedestal or collapse the lowering mechanism, rest the tabletop on the opposing bench cleats, and arrange the cushions into one continuous mattress. The deciding factors are level support, secure load transfer, correct cushion fit, and hardware that matches the camper’s structure. Test every connection before sleeping on the converted platform.


