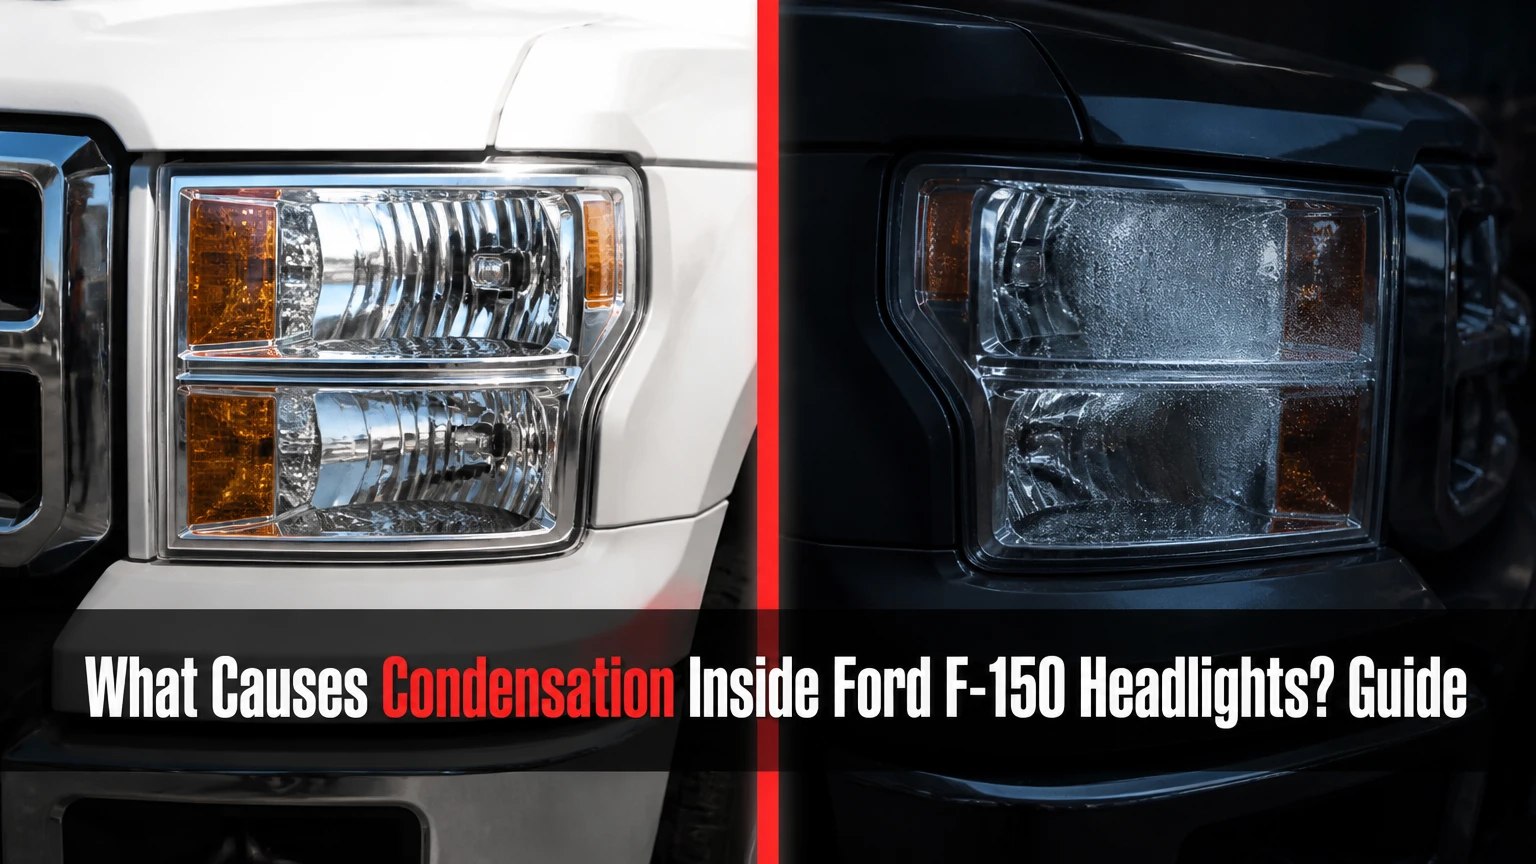
Condensation inside Ford F-150 headlights forms when humid air inside the vented headlight assembly meets a lens surface colder than the air’s dew point. Normal thermal breathing can create a thin temporary haze, especially after rain or a car wash; standing water, large droplets, streaks, or fogging that persists beyond dry weather usually indicates a failed cap, vent, lens, housing seam, or crack.
Key Facts at a Glance
- Ford F-150 headlight assemblies are vented systems, not permanently airtight containers.
- Condensation is normal only when a light mist clears during dry operation and does not form pools.
- A loose rear bulb cover, blocked breather, damaged gasket, crack, or perimeter seal can admit excessive water.
- Factory LED headlights often clear more slowly than halogen lamps because LED light sources produce less forward heat.
- Standing water can damage LED drivers, connectors, coatings, and circuit boards even when the lamp still works.
- Drilling a drain hole or applying high heat can create a larger leak and permanently deform the housing.
What causes condensation inside Ford F-150 headlights?
Ford F-150 headlight condensation is caused by a dew-point change inside a vented assembly. Moist outside air enters during pressure equalization, then water vapor condenses when the inner lens becomes colder than that air. Rain, car washes, overnight cooling, high humidity, temperature swings, blocked vents, loose rear caps, cracks, and failed housing seals all influence the result.
The physical process is straightforward. Air at 20°C and 80% relative humidity has a dew point of roughly 16°C. If that air reaches a polycarbonate lens cooled below 16°C, invisible vapor becomes microscopic droplets. The same process creates dew on a truck windshield or bathroom mirror.
Ford does not design the headlamp as a sealed pressure vessel. The assembly must accommodate expansion when sunlight or lamp operation warms the internal air. Hella, a major automotive-lighting supplier, describes condensation as a consequence of temperature and humidity changes and states that headlamp condensation is not automatically a product defect.
The important distinction is quantity and persistence. A translucent haze that appears after a cold wash and disappears during a dry drive is usually a moisture-cycle event. A puddle at the bottom of the housing is a water-ingress problem.
How does a Ford F-150 headlight breathe?
A Ford F-150 headlight breathes through engineered vents or breather membranes that equalize internal pressure while limiting direct water entry. When the housing heats, expanding air exits; when it cools, contracting air draws humid ambient air through the same ventilation path. The vent prevents pressure stress, but it cannot eliminate humidity.
The cycle has four stages:
- Heating: Sunlight or the lamp raises housing temperature, causing internal air to expand.
- Exhaust: Expanding air leaves through rear vents or membrane breathers.
- Cooling: The truck is parked, driven into cold rain, or sprayed at a wash, lowering lens temperature.
- Condensation: Contracting air draws humid air inward, and vapor condenses on the cold lens.
Ventilation does not mean water should freely enter the lamp. Proper vents use location, geometry, shields, and sometimes hydrophobic membranes to restrict liquid splash. A vent can still admit humid air, and a damaged vent can admit liquid water.
A common diagnostic mistake is to assume that every vent must be visibly open. Some breathers use a membrane that looks blocked from the outside. Do not puncture, remove, or enlarge it unless Ford’s service information specifically directs that procedure for the exact assembly.
Which F-150 headlights are most likely to fog?
All F-150 headlight types can develop condensation because halogen, factory LED, projector, and adaptive lighting assemblies use temperature-changing, vented housings. Factory LED units usually clear more slowly, while halogen units often warm the assembly faster near the bulb. Model year alone does not prove a defect.
| F-150 configuration | Typical heat behavior | Common moisture observation | Main inspection point |
|---|---|---|---|
| 2015-2020 halogen | Bulb produces substantial local heat | Haze may clear within 15-60 minutes of operation | Bulb cover and seal |
| 2015-2020 factory LED | Rear heat sink moves heat away from lens | Haze can remain for several hours | Vents, connectors, housing seam |
| 2021-2023 factory LED | Low lens heat, complex electronics | Fine mist may clear slowly in cold weather | Rear module and vent path |
| 2024 and newer LED systems | Heat varies by lamp module and software-controlled output | Repeated one-side fogging needs inspection | Housing, vent, and service guidance |
These are practical tendencies, not Ford performance specifications. Ambient temperature, humidity, vehicle speed, sun exposure, and the amount of liquid water matter more than the badge on the lamp.
Aftermarket LED bulb conversions create a separate risk. An incorrect collar, missing O-ring, oversized heat sink, or poorly fitted dust cap can prevent the original rear seal from seating. The bulb may illuminate normally while the housing becomes vulnerable to rain.
Is condensation inside an F-150 headlight normal?
A thin, temporary film is generally normal when the moisture is evenly distributed, contains no large droplets, does not pool, and clears during dry weather or normal operation. Ford’s exact warranty interpretation depends on the vehicle, assembly, and inspection, so the 24-48-hour period is a practical diagnostic window rather than a universal guarantee.
| Observation | Likely interpretation | Immediate action | Escalation point |
|---|---|---|---|
| Fine haze in one lower corner | Normal thermal condensation | Drive and monitor | Still present after 48 dry hours |
| Thin mist over part of lens | Usually normal vent breathing | Photograph and observe | Repeats after every short trip |
| Large isolated droplets | Possible liquid entry | Inspect cap and housing | Droplets increase after rain |
| Vertical streaks | Water running inside lens | Stop treating as normal fog | Dealer or repair inspection |
| Water pooled at base | Definite excessive ingress | Dry and inspect promptly | Replace or professionally repair |
| Moisture near LED electronics | Electrical contamination risk | Avoid repeated wet operation | Professional diagnosis |
The “less than 50 percent of the lens” rule sometimes appears in owner discussions, but it should not be treated as a universal Ford specification for every F-150 lamp. Coverage decisions normally consider the pattern, quantity, persistence, visibility impact, and evidence of a failed component.
A fine mist can remain longer on a cold LED lamp than on a halogen lamp. That difference alone does not prove that the LED housing leaks.
Why does fogging appear after rain or a car wash?
Rain and car washes create condensation by combining humid air with a rapid lens-temperature drop. High-pressure spray can also force liquid past a damaged cap, vent, crack, or housing seam, so fogging that begins only after washing deserves a closer inspection.
A normal wash-related pattern appears soon after the truck encounters cold water and gradually reduces as the lamp warms and outside weather dries. A leak-related pattern usually leaves larger droplets, returns on the same side, or becomes worse after direct spray at a particular corner.
Do not use a pressure washer close to the headlamp seam. Typical automotive practice keeps the nozzle at least 30-60 centimeters away and avoids directing a concentrated jet at vents, access covers, and panel gaps. Vehicle-wash instructions can impose stricter limits.
External moisture looks different. If the haze wipes away from the outside with a clean microfiber towel, the problem is surface condensation, not moisture inside the assembly. A quick test is to touch the outer lens carefully in two places. Internal fog remains visible after the outside surface is dry.
What parts cause an F-150 headlight to leak?
The most common leak points are rear access covers, bulb or module gaskets, vent membranes, housing cracks, mounting damage, and the bonded perimeter seam. The correct repair depends on the entry point, because drying a lamp without restoring the failed barrier only produces temporary improvement.
| Failure point | Typical clue | Inspection method | Usual remedy |
|---|---|---|---|
| Rear bulb dust cap | Fogging follows bulb replacement | Check even seating and locking tabs | Replace or reseat gasket |
| LED module connector seal | Moisture near rear electronics | Inspect connector and seal for damage | Replace seal or module-related part |
| Breather vent | Repeated fogging with no puddle | Look for mud, salt, insects, or torn membrane | Clean exterior, replace damaged vent |
| Polycarbonate lens | Crack or impact mark | Inspect edges and mounting tabs under bright light | Replace housing |
| Perimeter bonding seam | Water line around lens edge | Check seam for separation or gaps | Professional reseal or replacement |
| Mounting tab or rear shell | One-sided water entry after impact | Compare housing to opposite side | Replace damaged assembly |
Expert rule of thumb: the lowest visible water mark is not necessarily the entry point. Water can travel along internal ribs, wiring, or the reflector before collecting at the bottom.
A vent that looks clean does not rule out failure. The membrane may be detached, saturated, or damaged behind a shield. Conversely, opening a vent with a drill can turn a controlled breather into an unfiltered intake.
How can you diagnose the source without damaging the lamp?
Diagnose an F-150 headlight leak by documenting the moisture, checking whether the outside surface is dry, inspecting rear covers, and comparing the affected lamp with the opposite side. Remove the assembly only when the basic inspection identifies persistent moisture or visible damage.
Use this sequence:
- Photograph the worst condition. Capture droplets, streaks, pooling, and the vehicle identification number if warranty review may follow.
- Dry the outer lens. Confirm that the moisture remains inside.
- Record conditions. Note rain, wash exposure, outside temperature, humidity, and clearing time.
- Inspect rear covers. Confirm that every dust cap, bulb socket, connector, and gasket is fully seated.
- Compare both sides. A similar haze in both lamps after the same weather points toward normal condensation; one wet lamp points toward a local fault.
- Inspect the seam and tabs. Use a bright flashlight, but do not pry the polycarbonate lens apart.
- Check electrical symptoms. Flicker, warning messages, intermittent DRLs, or nonfunctional segments increase the urgency.
Do not spray water deliberately into the engine bay to reproduce the fault. Controlled testing requires correct spray equipment, safe electrical isolation, and knowledge of the assembly’s vent locations.
How do you dry a fogged F-150 headlight safely?
Dry a lightly fogged F-150 headlight by improving ventilation, using gentle ambient warmth, and correcting the access-cover problem; complete drying commonly takes 30 minutes to several hours after removal, depending on liquid volume. Standing water inside an LED assembly requires faster professional attention because electronics may already be contaminated.
Before you start
| Requirement | Typical specification | Why it matters |
|---|---|---|
| Work time | 1-3 hours | Includes access and reinstallation |
| Skill level | Moderate mechanical skill | Bumper or grille access may be required |
| Tools | 8 mm, 10 mm, trim tool, flashlight | Fastener and cover inspection |
| Drying method | Room-temperature air or low-warm hair dryer | Limits lens deformation |
| Materials | Clean towels, nitrile gloves, replacement gasket | Prevents contamination and repeat leaks |
| Replacement decision | New assembly if cracked or electronics are wet | Resealing cannot restore damaged circuits |
Step 1: Disconnect power when removing the assembly
Follow the service procedure for the specific model year and lighting system. If the assembly contains high-voltage or adaptive components, do not unplug modules casually; some systems require initialization or calibration after replacement.
Checkpoint: The lamp is stable, protected from scratches, and disconnected according to the vehicle procedure.
Common mistake: Pulling on wiring or forcing a connector whose lock has not been released.
Step 2: Open the approved rear access points
Remove the bulb, service cover, or module access cap only as the design permits. Place removed parts on a clean surface and inspect every rubber seal for flattening, tears, grit, or distortion.
Checkpoint: Every cap has an intact gasket and a clear seating surface.
Common mistake: Applying thick grease that prevents the cap from locking. A very thin film of compatible silicone grease may help a gasket, but dielectric grease is not a substitute for a damaged seal.
Step 3: Evaporate moisture with low heat and airflow
Use a hair dryer on a low or cool setting from at least 30 centimeters away, moving continuously. Never use an industrial heat gun, direct sunlight through a magnifying effect, or a heat source that makes the plastic hot to the touch.
Checkpoint: No visible droplets remain and the lens temperature stays comfortable to touch.
Common mistake: Closing the housing while warm, humid air remains trapped inside.
Step 4: Inspect vents, cracks, and the seam
Remove external debris from vent shields with a soft brush. Do not insert wire, drill bits, or compressed air into a membrane. Examine mounting tabs and the bottom seam for impact damage.
Checkpoint: The vent is undamaged, the shell has no crack, and the cap locks evenly.
Common mistake: Assuming silicone on the outside will fix a cracked or separated housing.
Step 5: Reassemble and monitor
Install the original or correct replacement cover, reconnect the lamp, and observe it through the next rain event and two dry cycles. Keep a dated photograph if the fault returns.
Checkpoint: No pooled water forms, and any light mist clears within the next dry operating period.
Common mistake: Treating temporary clearing as proof of a permanent repair.
Silica-gel packets can absorb residual moisture during disassembly, but they must remain outside the optical path and must not be left loose inside a lamp where they can contact wiring, reflectors, or hot components. Desiccant cannot repair an active leak.
What is the difference between drying, resealing, and replacing?
Drying removes moisture, resealing repairs a confirmed bond or gasket fault, and replacement is appropriate for a cracked shell, damaged electronics, distorted lens, or unreliable seam repair. Resealing a modern F-150 headlight is not automatically cheaper or safer because the original optical and electronic alignment can be difficult to restore.
| Repair path | Typical parts cost, USD | Typical labor time | Best use case | Main limitation |
|---|---|---|---|---|
| Reseat rear cap | $0-$40 | 15-45 minutes | Loose or displaced gasket | Does not fix cracked plastic |
| Replace gasket or vent | $20-$150 | 30-120 minutes | Identified serviceable seal | Part availability varies |
| Professional reseal | $150-$500 | 2-5 hours | Separated seam with dry electronics | Long-term result depends on bonding |
| Used OEM assembly | $250-$900 | 1-4 hours | Budget replacement with verified part number | Unknown history and seal condition |
| New aftermarket assembly | $300-$1,500 | 2-5 hours | Styling or unavailable OEM part | Fit, beam pattern, and electronics vary |
| New OEM LED assembly | $800-$2,500 or more | 2-6 hours | Cracked or electronically damaged lamp | Programming and calibration may add cost |
These are typical North American ranges, not Ford quotations. Labor rates, adaptive hardware, dealer markup, regional supply, and model year can move the final price substantially.
A reseal is a poor choice when the lamp contains standing water, the LED driver has corrosion, the lens is cloudy, or the housing has multiple cracks. A replacement is also not automatically successful if the underlying bumper, grille, or mounting structure directs water toward the new lamp.
Can Ford replace a fogging headlight under warranty?
Ford may replace an F-150 headlight under warranty when inspection confirms excessive water intrusion, a failed seal, or another warrantable defect, but condensation alone does not guarantee coverage. Warranty duration, mileage, region, vehicle use, modifications, and the dealer’s diagnosis determine the result.
For many new-vehicle warranties, owners often reference a 3-year or 36,000-mile basic coverage period in the United States, but the applicable terms must be verified in the truck’s warranty guide. A General Service Bulletin is guidance for diagnosis or repair; it is not automatically a warranty authorization for every vehicle.
Before visiting a dealer:
- Photograph the lamp when droplets or pooling are most visible.
- Record the date, weather, wash type, and time needed to clear.
- Do not apply silicone, drill holes, or open the bonded lens first.
- Bring evidence of a loose cap, crack, malfunction, or repeated recurrence.
- Ask the dealer to document whether the condition is mist, droplets, streaking, or standing water.
Ford Lightning, F-150, and different model-year forums may use different terminology and service references. Verify any bulletin number against the exact VIN and model year rather than relying on an online post.
Which repair option fits each situation?
The best repair path depends on water quantity, component type, vehicle coverage, and whether the lamp has been modified. A covered truck with pooled water should go to Ford first, while an out-of-warranty truck with a confirmed loose cap may need only a gasket or reseating.
| Owner situation | Preferred first action | Avoid | Decision trigger |
|---|---|---|---|
| Truck under basic warranty | Document and request dealer inspection | DIY opening or resealing | Coverage terms and diagnosis |
| Fine mist after cold wash | Monitor for 24-48 dry hours | Drilling or immediate replacement | Persistence or increasing droplets |
| Loose halogen dust cap | Dry and replace or reseat cap | Running without the cover | Recurrent fogging after reseating |
| Pooled water in factory LED lamp | Stop repeated wet operation and inspect promptly | Leaving electronics submerged | Corrosion, flicker, or warning message |
| Aftermarket LED conversion | Restore correct collar and seal | Forcing an oversized heat sink | Cap cannot lock flush |
| Cracked or impact-damaged housing | Replace assembly | External caulk-only repair | Visible crack or seam separation |
An aftermarket assembly can solve a defective housing, but it may introduce beam-pattern, connector, daytime-running-light, or calibration problems. Confirm the exact F-150 generation, trim, market, connector layout, and lighting functions before ordering.
What mistakes make headlight condensation worse?
The most damaging shortcuts are drilling the housing, using excessive heat, sealing over a dirty surface, and ignoring standing water. These actions can destroy vent control, deform polycarbonate, trap moisture, or accelerate corrosion.
- Drilling drain holes: A hole admits dust, road salt, insects, and splash water continuously.
- Using a heat gun: High localized temperature can warp the lens, reflector, adhesive, or LED optics.
- Applying household silicone: Some sealants release curing compounds that can affect reflective coatings, and exterior caulk does not restore structural bonding.
- Blowing high-pressure air into the vent: Air can detach a breather membrane or force debris deeper into the assembly.
- Leaving desiccant loose inside: Packets can move into the beam path or contact electronics.
- Ignoring a puddle because the lamp still works: Moisture damage often appears later as flicker, dim segments, corrosion, or intermittent faults.
- Touching halogen bulb glass: Skin oils create hot spots that shorten bulb life or break the bulb.
Expert rule: diagnose the entry path before selecting a sealant. A repair that dries the lens but leaves the cause untouched is a reset, not a fix.
How can you prevent repeat fogging?
Prevent repeat condensation by keeping rear covers seated, preserving the factory vent, avoiding direct pressure-washer spray, and correcting any aftermarket bulb fitment. Parking under cover can reduce thermal swings, but it cannot compensate for a cracked housing or failed gasket.
Use these prevention practices:
- Inspect headlight caps after every bulb or LED conversion.
- Replace flattened, torn, or hardened gaskets rather than stretching them.
- Keep mud and salt away from vent shields without puncturing membranes.
- Confirm aftermarket bulb collars do not interfere with the dust cover.
- Avoid washing a cold lamp with very hot water or directing a pressure jet at its seam.
- Check mounting tabs after minor front-end impacts.
- Monitor one-sided recurrence, which often indicates a local seal failure.
Humidity alone does not prove a leak. A coastal Florida truck can fog more often than a dry Colorado truck while both assemblies function normally. Frequency matters less than clearing behavior, liquid quantity, and electrical symptoms.
Frequently Asked Questions
Does condensation mean my F-150 headlight is broken?
No. A brief, fine haze can result from normal venting and dew-point changes, especially after rain or a cold car wash. The headlight becomes suspect when large droplets, vertical streams, pooling, repeated one-sided moisture, reduced light output, or electrical faults appear.
Should I drive with water inside an LED headlight?
Avoid unnecessary driving with standing water inside an F-150 LED headlight. Water can corrode connectors and circuit boards even when the light currently works, while a thin mist without pooling is usually less urgent. Dry-weather travel to a repair facility is preferable to repeated exposure to rain.
Why does only one F-150 headlight fog?
One-sided fogging usually points to a local difference, such as a loose rear cap, damaged vent, impact crack, poor aftermarket bulb fit, or separated seam. If both lamps fog under identical weather conditions and clear together, normal atmospheric breathing is more likely.
Can I use rice to dry a headlight?
Rice is a poor drying method for an F-150 headlight because it sheds dust, absorbs moisture slowly, and cannot repair an active leak. Controlled low-temperature airflow and a properly removed access cover are safer. Desiccant packets can assist during service, but they should not be left loose inside the assembly.
How long does F-150 headlight condensation last?
Fine condensation commonly clears within several hours to 24-48 hours of dry weather, depending on temperature, humidity, sunlight, and lamp type. Persistent droplets, streaks, or pooled water should not be excused by the 48-hour guideline because those patterns indicate excessive liquid entry.
Is external fogging the same as internal condensation?
No. External fogging sits on the outside of the lens and wipes away with a clean, dry microfiber towel. Internal condensation remains visible after the outside surface is dry and may appear behind the reflector or along the inner lens surface.
The Bottom Line
What causes condensation inside Ford F-150 headlights is usually the interaction of humid air, a cold lens, and the assembly’s normal venting system. Fine temporary mist can be normal, but heavy droplets, streaks, pooling, repeated one-sided fogging, or moisture that survives dry weather indicates a cap, vent, crack, gasket, or bonded-seam problem. Document the condition, avoid drilling and high heat, and use Ford warranty inspection first when coverage may apply.


